Supplying Artwork Guide (Print-Ready Files) | Image Magic Support Guides
Supplying Artwork Guide
This guide outlines what you need to consider when supplying artwork to avoid delays and ensure high-quality printing.
Quick Checklist (Before You Upload)
- Artwork includes 3mm bleed (where required).
- Keep important text/logo inside safe margin (at least 5mm).
- Export print files at 300dpi and use CMYK colour mode.
- PDF fonts are embedded (or text outlined where required).
- Max upload size is 50MB (use WeTransfer if larger).
File Formats - Please include bleed in final artwork
Bleed is the extra area of ink beyond the trim edge to ensure colour reaches the edge after cutting. Because there can be slight movement during printing and trimming, you should create 3mm bleed on all sides where bleed is needed. Files without bleed may result in thin white lines after trimming.
File Size - Max upload 50MB
- The maximum file size you can upload via our website is 50MB. If your file is larger, please use www.wetransfer.com and send it to [email protected].
- It is also important that your file is not too small. An image that appears fine on screen may lose quality when printed at full size. Please refer to our Resolution Guide to ensure your image quality meets print requirements.
PDFs

Please supply artwork at 300dpi. When saving/exporting your PDF, use these recommended settings (available in most PDF export options):
- Resolution: High Resolution
- Compression: Colour and Greyscale downsampled to 300dpi, auto compression set to high quality
- Fonts: Embed all fonts
- Colour Mode: CMYK (if possible, choose FOGRA39 as the colour profile)
Illustrator
Embed all images and outline all text. Save/export as PDF (Acrobat 6.0).
Photoshop
Set resolution to 300dpi before you start designing. Save the file as TIFF or JPEG. Always set your document size to 3mm larger on each side (bleed) than the final trim size. Please keep your PSD file for future edits—TIFF/JPEG files cannot be edited easily for changes.
InDesign
Please export to PDF using these settings:
Step 1: Export to PDF
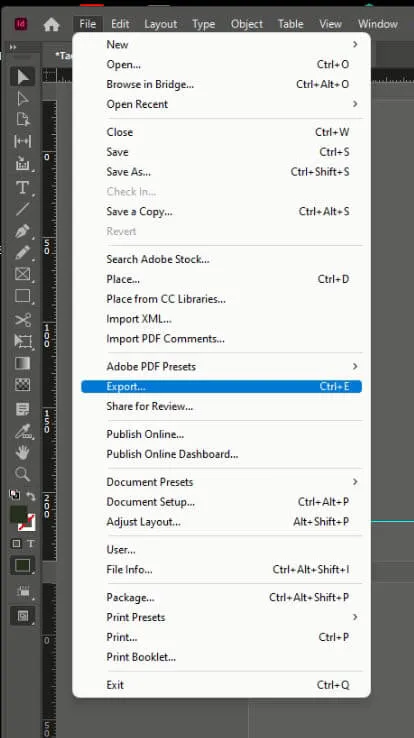
Step 2: Select Adobe PDF Preset: High Quality Print
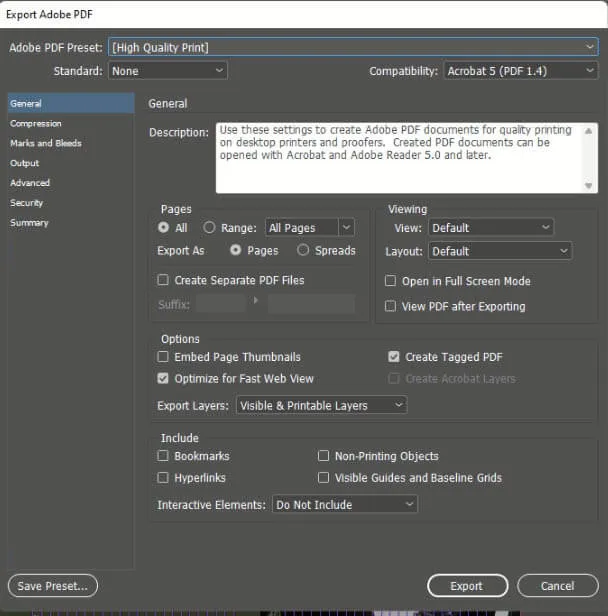
Step 3: Ensure high-resolution settings
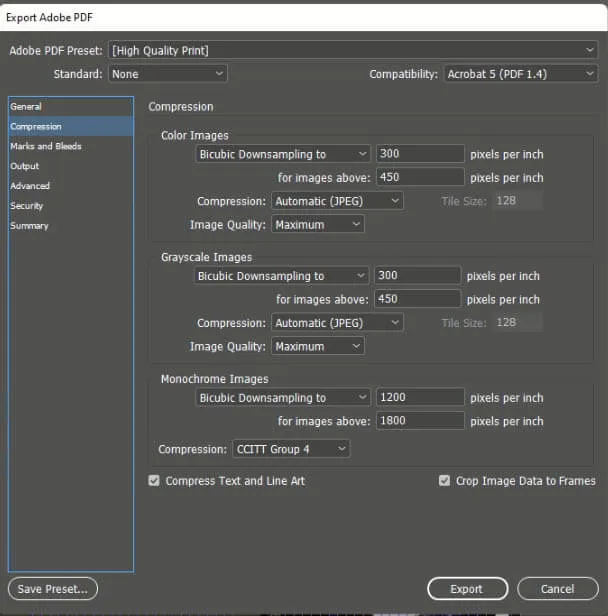
Step 4: Tick “Marks and Bleeds” options
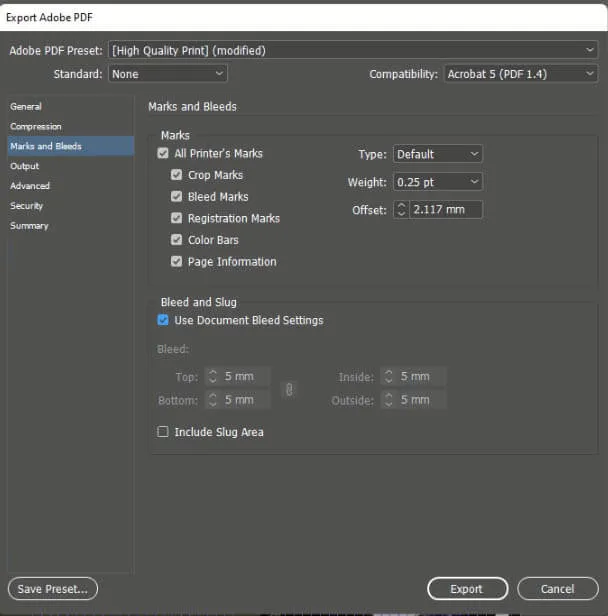
Please note: proofing and file-checking may sometimes delay printing and delivery.
Microsoft Documents
- Word, Excel, PowerPoint, Publisher and Works
- These applications are not designed to create print-ready artwork.
- Please convert Microsoft files to PDF. When exporting, ensure you select the correct final page size.
Colour: CMYK vs RGB
CMYK (Cyan, Magenta, Yellow, Black) is used for printing, while RGB (Red, Green, Blue) is used for screens. Please note: JPEG files are almost always in RGB mode.
For best colour matching, create your artwork in CMYK. If you design in RGB, printed colours may shift because many bright screen colours cannot be reproduced exactly in print.
Trim Marks
- Trim marks indicate the final cut size. Due to mechanical tolerances, the final cut may vary slightly. Keep all text and important elements inside the safe margin (at least 5mm from all edges).
Safe Area / Safe Margins
- Safe margins are the area clearly inside the cut line. Keep important information (names, addresses, phone numbers and logos) within the safe margin (at least 5mm from all edges) to prevent it from being cut off.
Aspect Ratio
- Aspect ratio is the image width divided by its height. If your image aspect ratio does not match the product’s aspect ratio, it may look stretched or distorted when scaled to fit.
Multipage products (booklet, perfect bind book, long brochure)
- Please submit a single PDF in the correct page order, with the front cover on Page 1 and the back cover on the last page. If you have multiple PDFs, name them by page order (e.g., 01_filename, 02_filename, etc.).
- If you need assistance with pagination, you may click “Upload Later” when submitting. We can help check the file order, but this may delay delivery.
Wire-O Bind Booklet
- Please leave a 10mm allowance on the binding edge for Wire-O finishing.

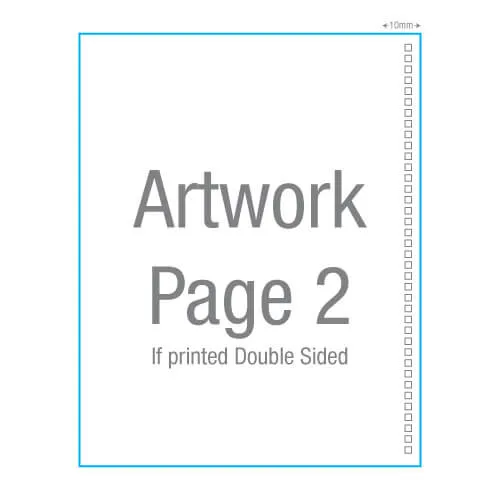
Spot UV and Hot Stamping
- Spot UV/Hot Stamping files usually require multiple PDF pages because we need a separate layer/page to indicate the finishing area. For full instructions, please refer to our Spot UV and Hot Stamping Guide.


